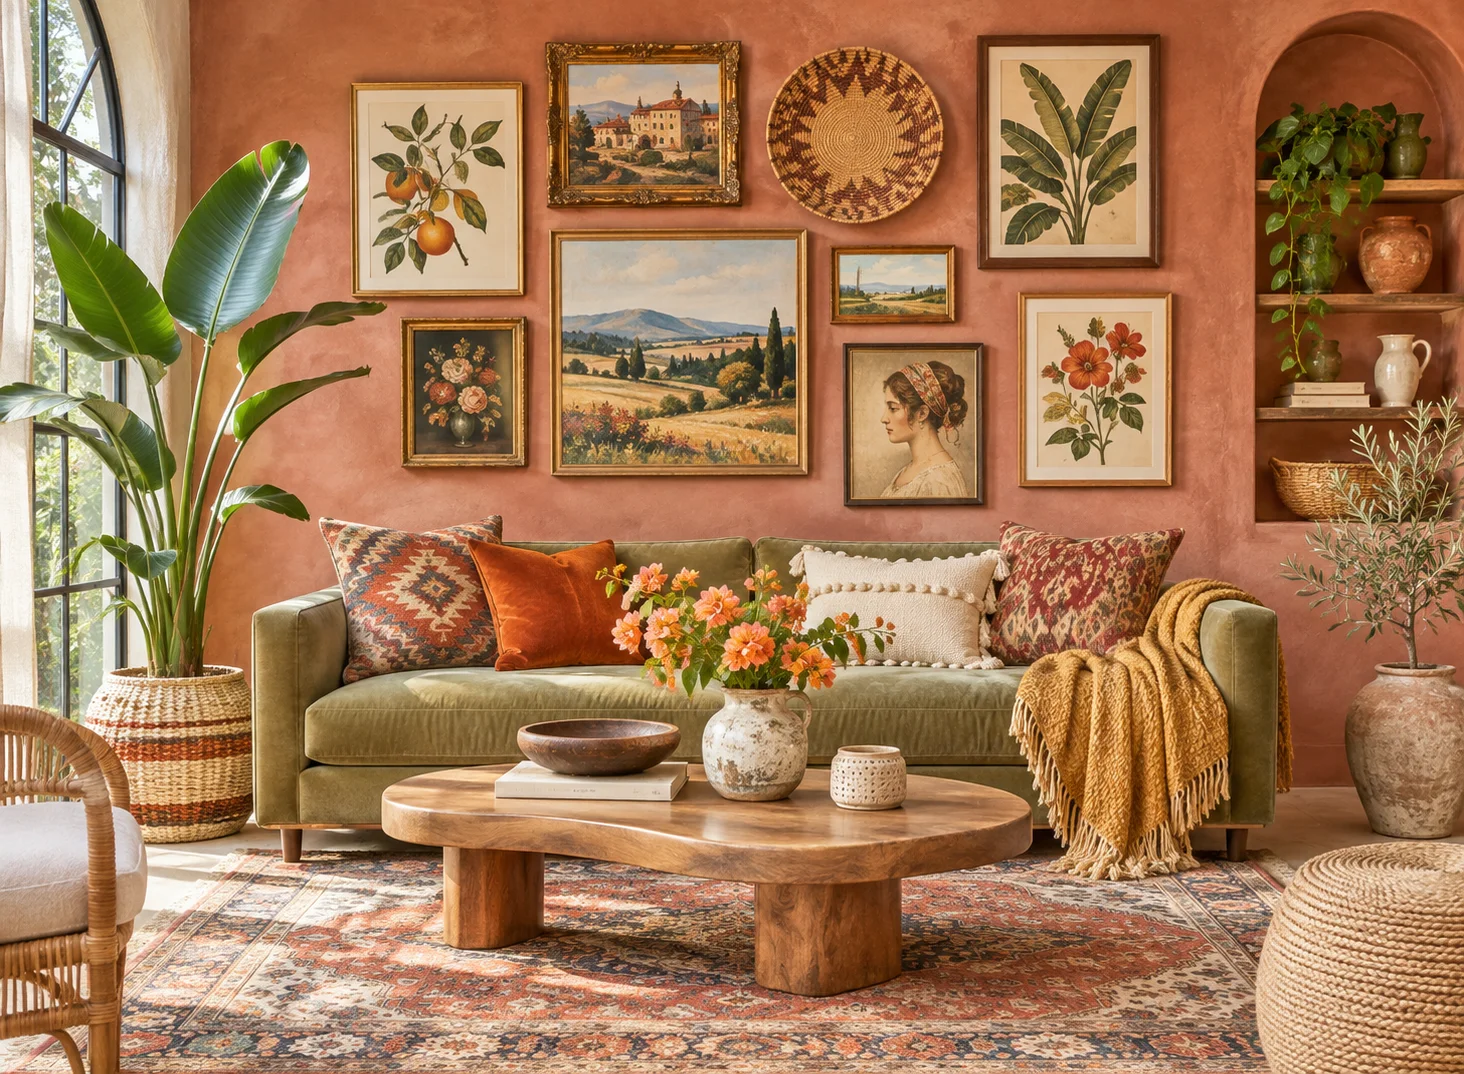
A blank wall above your sofa is one of the easiest places to make your living room feel more personal. Instead of hanging one large painting, a gallery wall lets you combine artwork, photographs, and meaningful pieces into a display that tells your story.
The challenge? Getting the sizes, spacing, and arrangement right without making your wall look cluttered.
The good news is that you don’t need an interior designer or expensive artwork to create a beautiful result. With a few simple measurements, a thoughtful arrangement, and the right hanging technique, you can transform that empty space in an afternoon.
Here’s how to create a gallery wall above your sofa, step by step.
Before You Start: Get the Measurements Right
The secret to a balanced gallery wall isn’t the artwork itself. It’s how the entire arrangement relates to your sofa.
Use these measurements as your starting point:
| Element | Recommended Measurement |
|---|---|
| Gallery wall width | 2/3–3/4 of sofa width |
| Space above sofa | 6–10 inches |
| Space between frames | 2–3 inches |
| Number of frames | 5–9 for a beginner-friendly arrangement |
For example, if your sofa measures 84 inches wide, aim for a gallery wall approximately 56–63 inches wide.

These are starting guidelines rather than strict rules. The size of your artwork, sofa height, and available wall space will influence the final placement.
Designer tip: Center the entire gallery wall above your sofa, not necessarily in the middle of the wall.
What You’ll Need
Gather your supplies before you begin so you can complete the project without unnecessary interruptions.
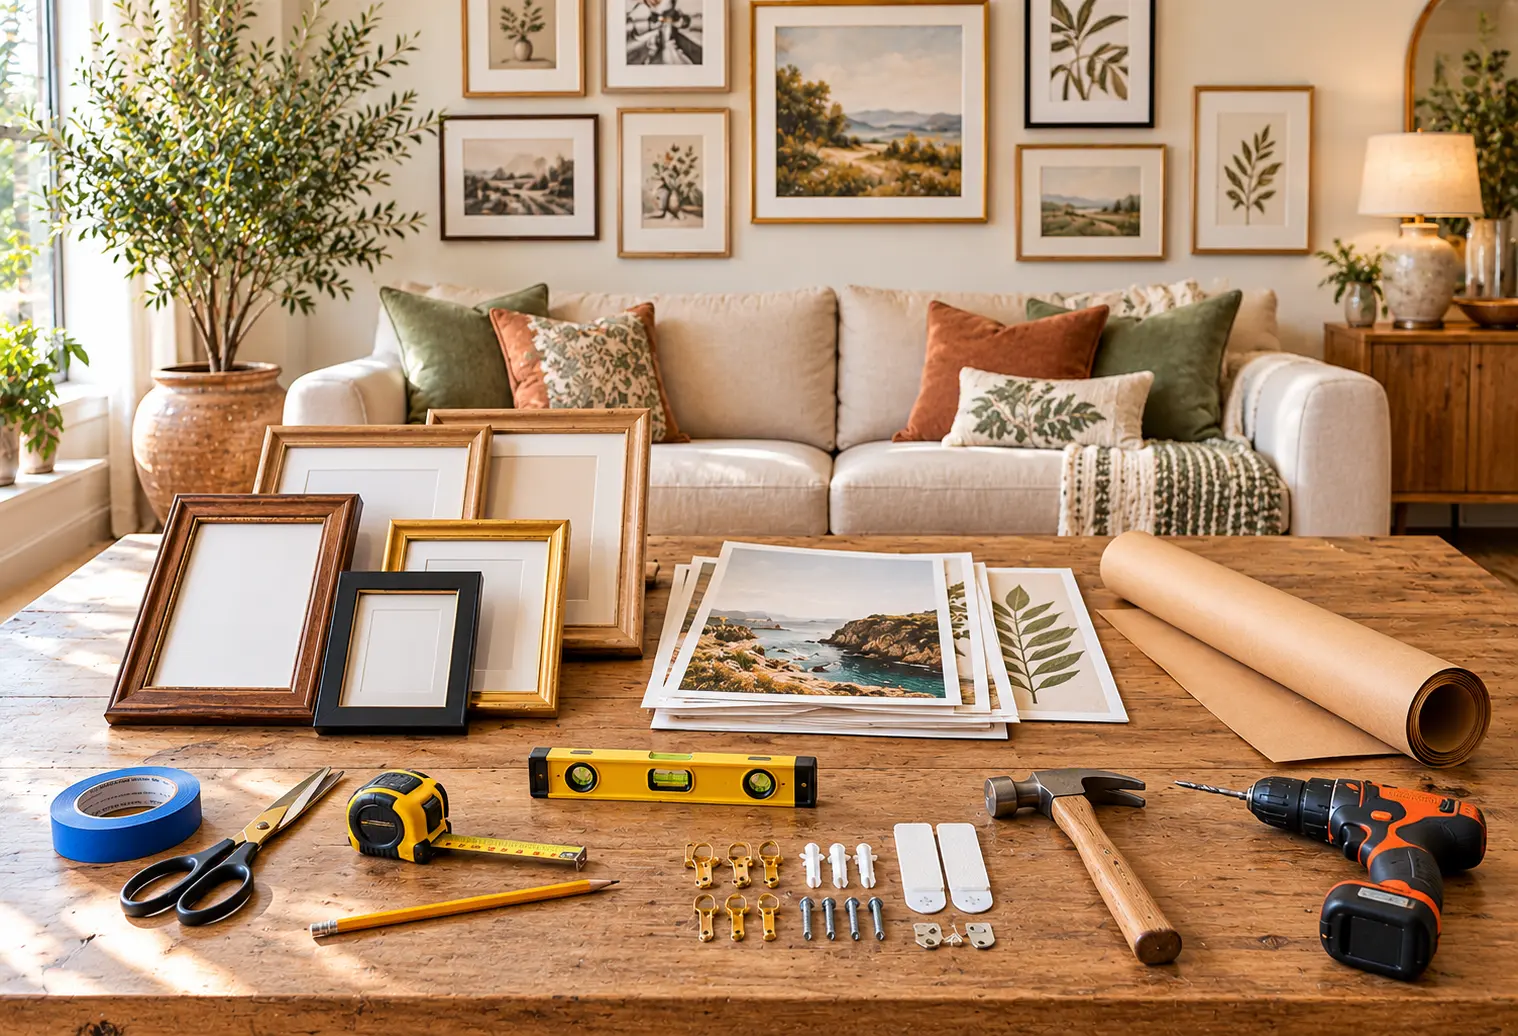
- 5–9 picture frames in complementary sizes
- Artwork, photographs, or printable wall art
- Measuring tape and pencil
- Kraft paper or old wrapping paper
- Painter’s tape and scissors
- Level
- Picture hooks, suitable wall anchors, or compatible hanging strips
- Hammer or drill, depending on your wall and hardware
Budget tip: You don’t need to buy everything new. Combine inexpensive frames with family photographs, vintage prints, or downloadable artwork to create a display that feels collected rather than store-bought.
Step 1: Choose a Gallery Wall Style
Before selecting your frames, decide what kind of gallery wall you want to create.
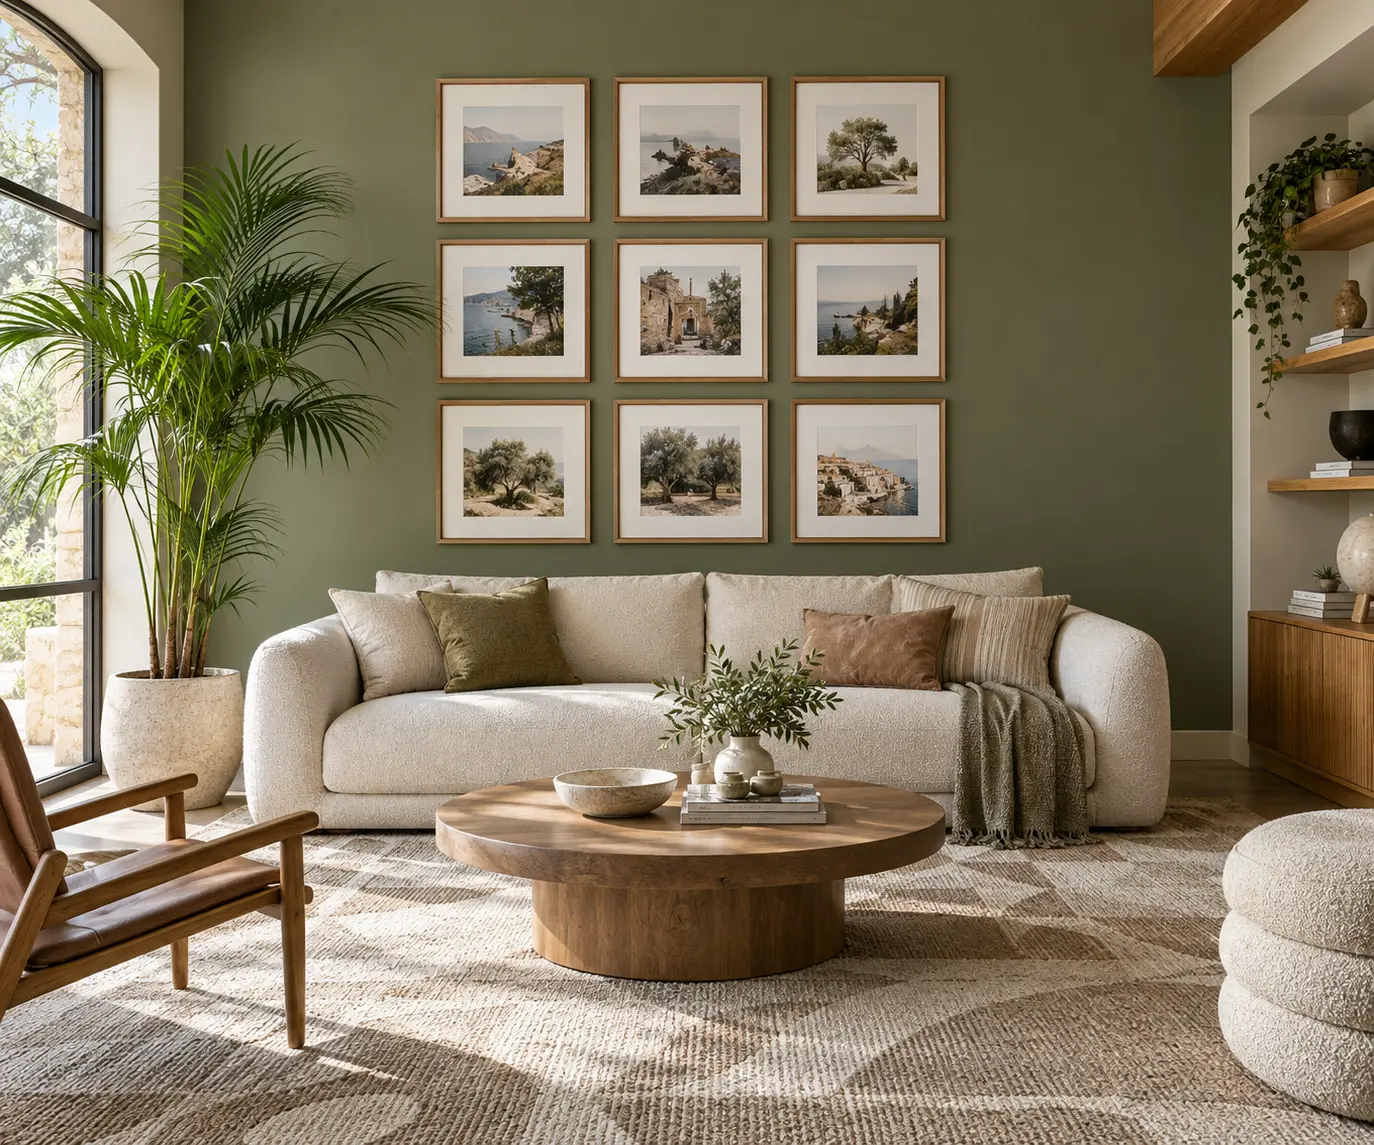
1. Symmetrical Grid
Identical frames arranged in neat rows and columns create a clean, structured appearance. This layout works especially well in minimalist, Scandinavian, and contemporary living rooms.
2. Organic Gallery Wall
Different frame sizes arranged in a relaxed but balanced composition give your display a collected look. This approach suits eclectic, bohemian, vintage, and cozy interiors.

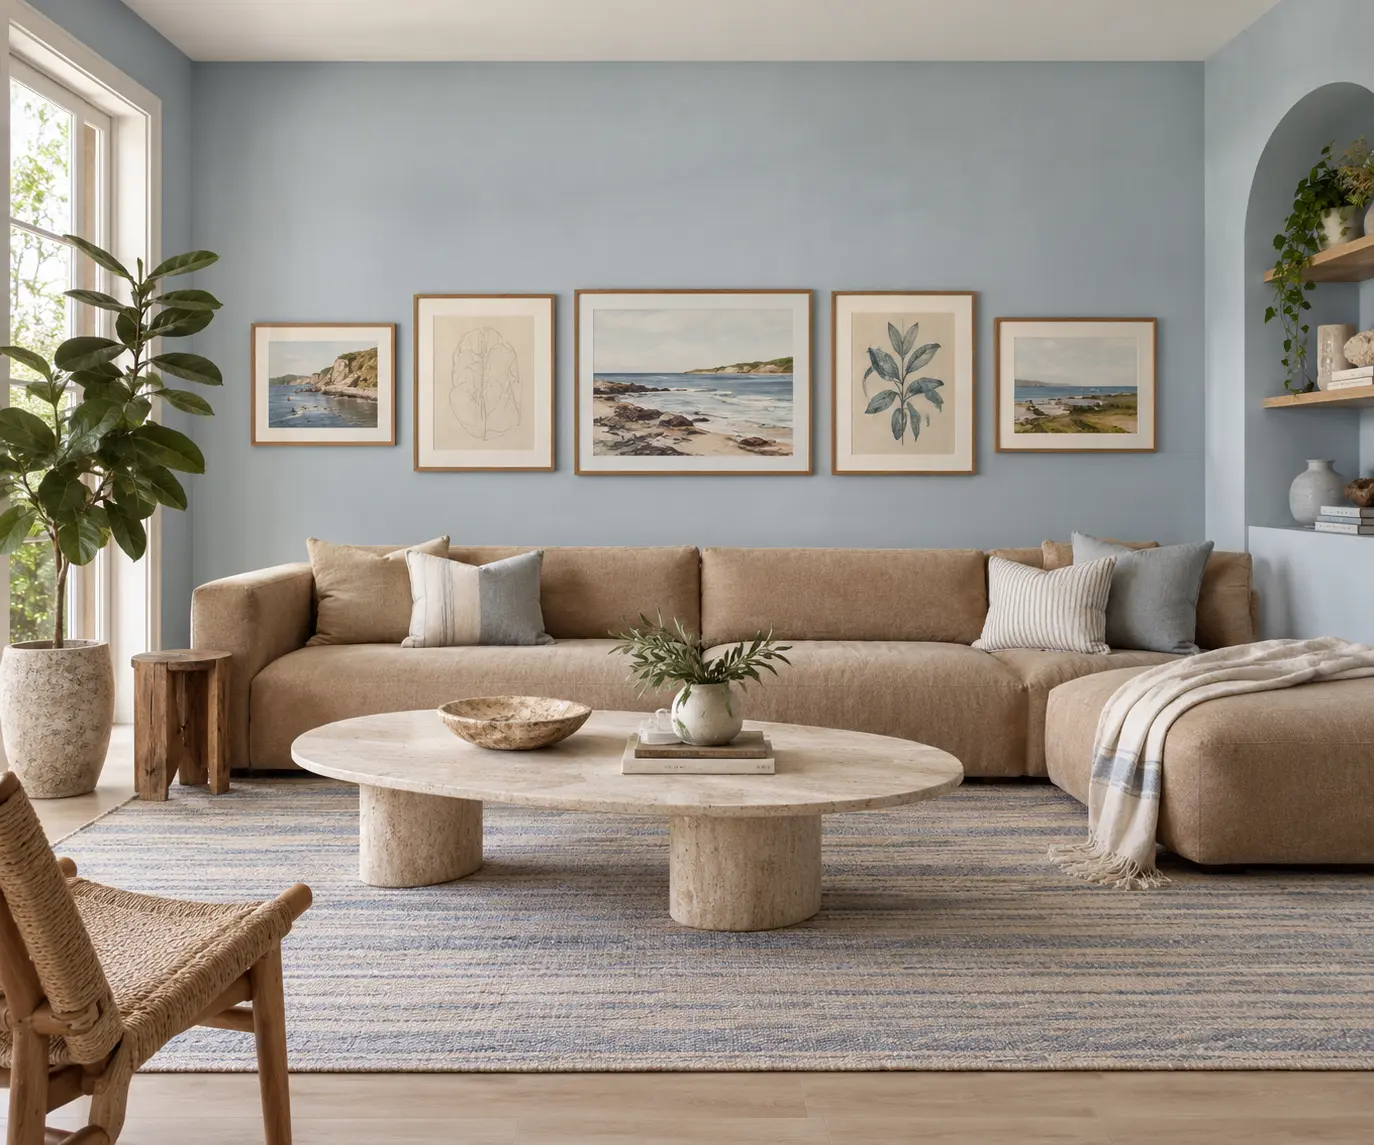
3. Linear Gallery Wall
A horizontal arrangement of coordinated frames creates a calm, streamlined look. This style works particularly well with modern furniture and long, low-profile sofas.
If this is your first gallery wall, a symmetrical or loosely structured arrangement is usually easier to plan and hang.
Step 2: Select Artwork That Works Together
Your gallery wall doesn’t need matching artwork, but the pieces should share something in common.
Start by choosing a simple color palette inspired by your living room. Pull two or three colors from your cushions, rug, curtains, or existing decor.
For example, a warm neutral living room might feature:
- Beige and terracotta abstract prints
- Black-and-white family photographs
- Soft botanical illustrations
- One statement piece with deeper colors
Mix photography, illustrations, and abstract artwork for visual interest.

Designer tip: Include one artwork that is noticeably larger than the others. This creates a focal point and helps smaller pieces feel connected.
Avoid choosing every print in the same size unless you’re planning a grid.
Step 3: Choose the Right Frame Combination
Frames help establish the personality of your gallery wall.
| Frame Type | Best Interior Styles |
|---|---|
| Natural wood frames | Scandinavian, organic modern, warm minimalist |
| Black frames | Contemporary, minimalist, industrial |
| Antique gold frames | Traditional, vintage, eclectic |
| Mixed frame finishes | Eclectic, collected, relaxed contemporary |
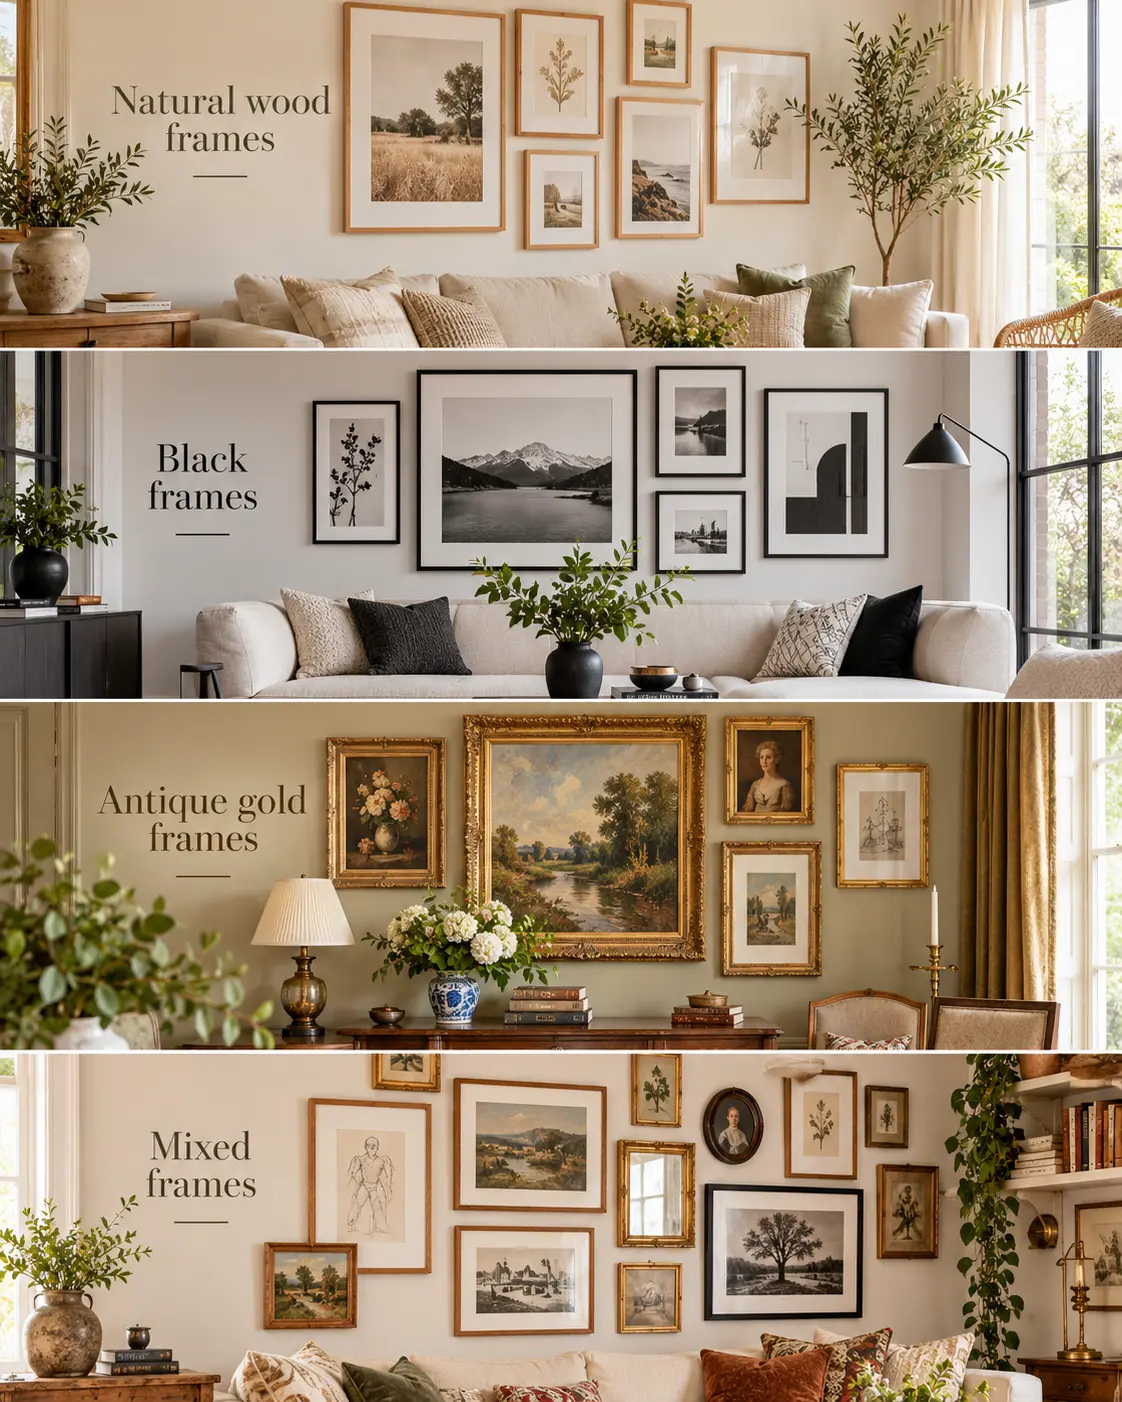
For a cohesive arrangement, repeat at least one frame color or material throughout the display.
If your artwork feels visually busy, use simpler frames and generous matting to give each piece breathing room.
Step 4: Arrange Your Frames on the Floor
This is where your gallery wall begins to take shape.
Lay all your framed artwork on the floor in front of your sofa. Try several arrangements before deciding on your favorite.
Start with your largest piece near the visual center, then arrange smaller frames around it.
Keep approximately 2–3 inches between neighboring frames and maintain a reasonably consistent visual rhythm.
Move pieces around until the arrangement feels balanced from left to right.
For an organic layout, you can mix horizontal and vertical frames, but avoid leaving one side noticeably heavier than the other.
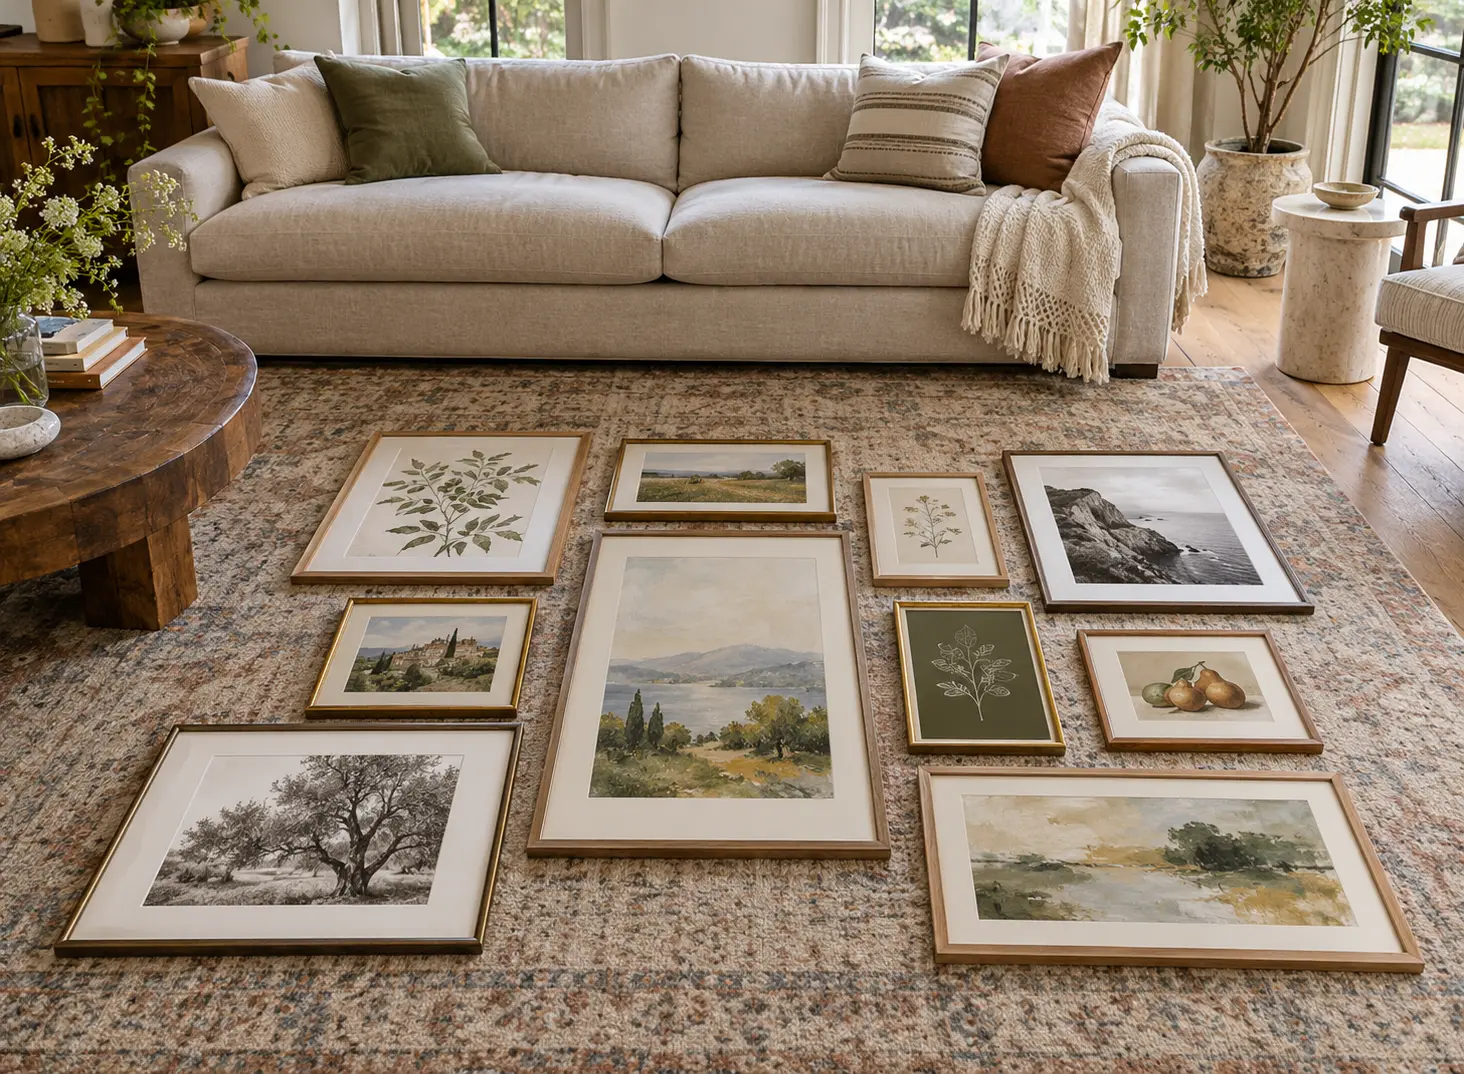
Pro tip: Take a photograph of your final floor arrangement. You’ll use it as a reference when transferring the layout onto the wall.
Step 5: Create Paper Templates Before Hanging
Here’s the easiest way to avoid unnecessary holes in your wall.
Trace each frame onto kraft paper and cut out the shapes.
Label every template so you know which artwork belongs in each position.
Using painter’s tape, attach the templates to the wall in your planned arrangement.

Stand back and examine the composition from different positions in your living room.
Check three things:
- Is the entire arrangement centered over the sofa?
- Does the bottom edge sit comfortably above the sofa back?
- Does the arrangement feel balanced without crowding the wall?
Make any adjustments while the paper templates are still in place.
Pro tip: Sit on your sofa and check whether anyone’s head or shoulders could bump the lowest frames. Increase the clearance if needed.
Step 6: Hang Your Artwork Securely
Once you’re satisfied with the layout, it’s time to hang the frames.
Start with the largest or central artwork. This piece will help you maintain alignment as you work outward.
For each frame, measure the distance between the top of the frame and its actual hanging point. Transfer that measurement to the corresponding paper template.
Check for concealed wiring or plumbing before drilling. Select hardware rated for your frame’s weight and suitable for the wall material. Heavy frames may require studs or appropriate wall anchors.
Install the hardware according to its manufacturer’s instructions, remove the template, and hang the artwork.
Use a level to check alignment before moving to the next frame.
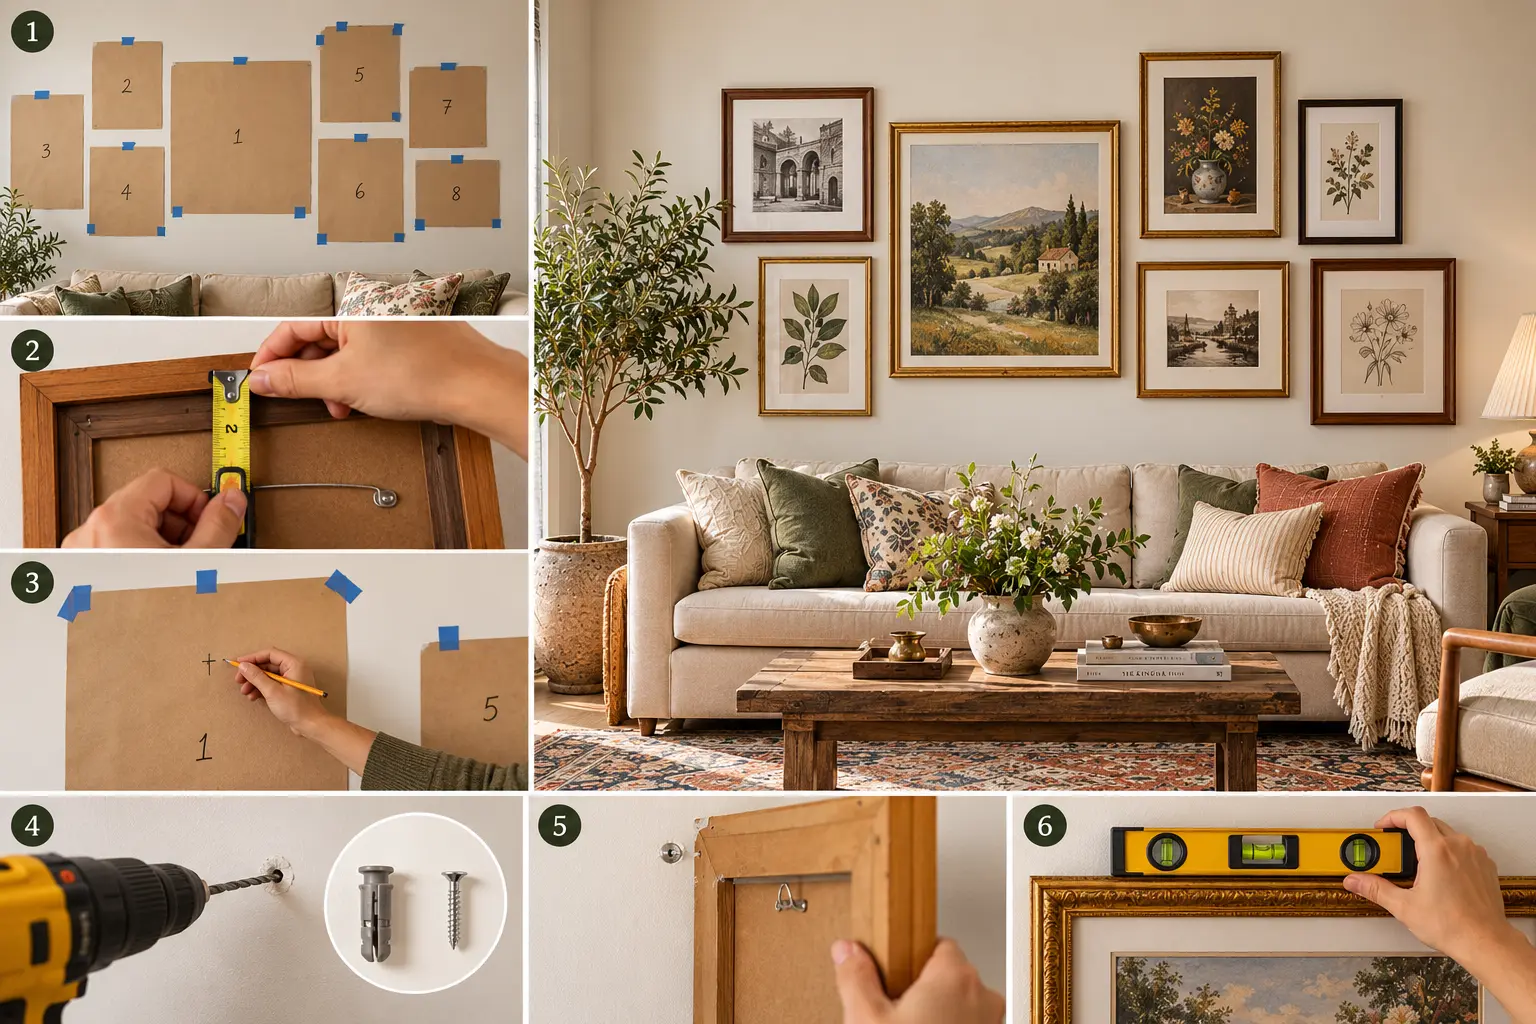
For lightweight pieces, suitable removable picture-hanging strips may be an option, provided the frame, wall surface, and weight meet the product’s requirements. Over a sofa, prioritize secure mounting rather than convenience.
Continue hanging from the center outward until your arrangement is complete.
Step 7: Style the Sofa Area for a Finished Look
Once the artwork is in place, consider how the gallery wall connects to the rest of the room.
A few thoughtful finishing touches can make your gallery wall look intentionally designed.
Repeat one or two artwork colors in your throw pillows or blankets. This creates a subtle visual connection between the sofa and the wall.
Keep nearby accessories relatively simple so they don’t compete with the artwork.
If your gallery wall contains plenty of color and detail, choose calmer cushions and textiles.
If the artwork is mostly neutral, introduce texture through linen, velvet, woven fabrics, or a patterned rug.

The goal isn’t to match everything. It’s to make the wall feel like a natural extension of the living room.
Common Gallery Wall Mistakes to Avoid
Even beautiful artwork can look awkward when the arrangement isn’t properly planned.
| Common Mistake | Easy Fix |
|---|---|
| Hanging artwork too high | Keep the bottom frames visually connected to the sofa. |
| Using only tiny frames | Introduce one or two larger anchor pieces. |
| Leaving inconsistent gaps | Use measured spacing between frames. |
| Mixing too many unrelated colors | Repeat a few colors across the collection. |
| Skipping the floor layout | Arrange and photograph everything first. |
| Using unsuitable hanging hardware | Match fixings to the frame weight and wall type. |
Remember that gallery walls should feel curated, not overcrowded. You don’t have to fill every inch of available wall space.
Frequently Asked Questions
How many pictures should go above a sofa?
Five to nine frames make a manageable starting point for many average-sized sofas. The ideal number depends on frame dimensions, wall width, and the overall composition. Three larger artworks can look just as effective as a collection of smaller pieces.
Should gallery wall frames match?
Not necessarily. Matching frames create a clean, structured look, while mixed frames feel more relaxed and collected. Repeating one or two finishes helps maintain cohesion.
Can I create a gallery wall in a small living room?
Absolutely. Try three to five appropriately sized frames with consistent spacing. A compact horizontal arrangement can add personality without overwhelming the room.
Can renters create a gallery wall without drilling?
Yes, some lightweight, compatible frames can be installed with removable picture-hanging products. Always check the specified weight limit, surface requirements, and removal instructions. Avoid placing inadequately secured artwork above seating.
Final Thoughts
Creating a gallery wall above your sofa is less about following a perfect formula and more about finding the right balance between scale, spacing, and personality.
Start with a clear layout, choose artwork that feels meaningful, and test the arrangement before making any holes.
With a little planning, your gallery wall can become one of the most inviting features in your living room—and a collection you can continue updating over time.
Save this guide for your next living room refresh, and explore more wall decor ideas from Home Style Studio Co.